By John Doe December 24, 2023
Summary: Navicat provides the ability for data in different databases and/or schemas to be kept consistent so that each repository contains the same information.
Table of Contents
About Data Synchronization
Navicat allows you to transfer data from one database and/or schema to another with detailed analytical process. In other words, Navicat provides the ability for data in different databases and/or schemas to be kept up-to-date so that each repository contains the same information. To open the Data Synchronization window, choose Tools -> Data Synchronization from the menu bar.
You can save your settings as a profile for future use or setting automation tasks. To open a saved profile, click the Load Profile button and select a profile from the list.
HINT: Profiles are saved under the Profiles Location.
NOTE: SQL Server 2000 does not support this feature. For Oracle server, BLOB, CLOB, NCLOB, LONG and LONG RAW data are skipped during the data synchronization process. TIMESTAMP primary key cannot synchronize (insert, update) with Database Link to 9i server. RAW primary key cannot synchronize (insert, update, delete) with Database Link to any server, without error.
NOTE: Available only for MySQL, Oracle, PostgreSQL, SQLite, SQL Server, MariaDB and MongoDB. Navicat Premium and Navicat for MySQL support synchronizing between MySQL and MariaDB.
Choose Connections & Comparing Options
Choose Source and Target Connections
In the Data Synchronization window, define connections, databases and/or schemas for Source Database and Target Database. You can click ![]() to swap the source and target settings.
to swap the source and target settings.
Choose Comparing Options
Then, click the Options button to set the comparing options.
Insert records
Insert records if the records do not exist in the target.
Delete records
Delete extra records from the target.
Update records
Update the target if the record is different from the source.
Choose Table / Collection Mapping
In this step, only tables/collections which contain identical names between the source and target are mapped in the list by default. If you do not want some tables/collections to be synchronized, disable them manually from the drop-down list.
Keys and fields which contain identical names are also mapped. You can change the mapping in the Key Mapping and Field Mapping columns.
After mapping the tables/collections, click Compare & Preview to view the comparison results (Step 3). If you want to skip the preview and deploy immediately, click Compare & Deploy.
View Data Comparison Results
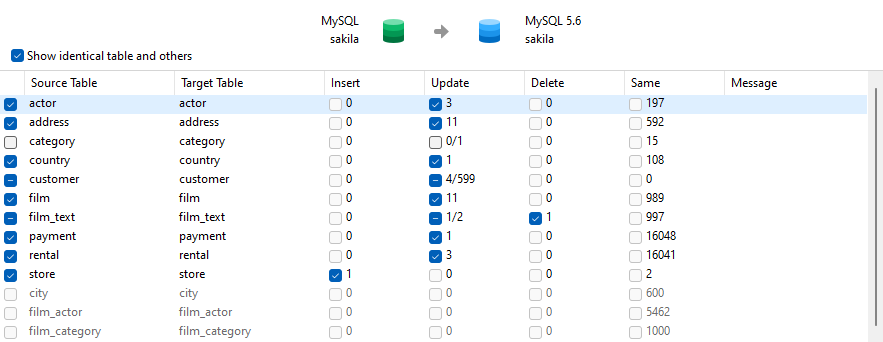
After comparing data, the window shows the number of records that will be inserted, updated or deleted in the target. Uncheck the Show identical table and others / Show identical collection and others option to hide the tables/collections with identical data and the tables/collections with different structures. All tables/collections with different data and all actions are checked by default. Uncheck the checkbox that you do not want to apply to the target.
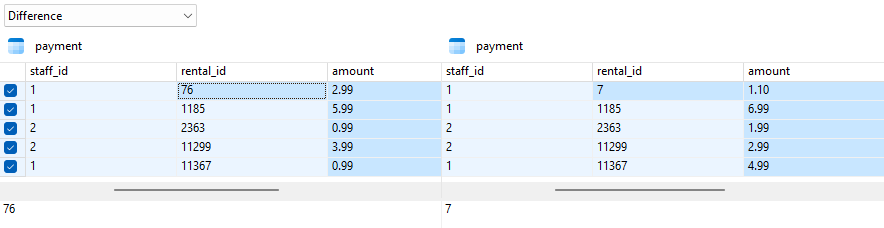
When you selected a table/collection in the list, the bottom pane shows data in the source and target. Values that differ between the source and target are highlighted. To view multiple lines data, right-click the grid and select Show Assistant Viewer. Uncheck the records that you do not want to apply to the target.
Choose an option from the drop-down list to show the data.
| Option | Description |
|---|---|
| Difference | Show all records that are different in the source and target. |
| Insert | Only show the records that do not exist in the target. |
| Update | Only show the records that exist in both source and target, but they have different values. |
| Delete | Only show the records that do not exist in the source. |
| Same | Show the records that exist in both source and target and they have identical values. |
| All Rows | Show all records in the source and target. |
Click the Next button to show the scripts of all selected tables/collections and records.
Edit & Execute Selected Scripts
You can view all scripts that will be executed in the target database in the Deployment Script tab.
| Deployment Options Button | Description |
|---|---|
| Deployment Options | Continue on error - Ignore errors that are encountered during the execution process if necessary. Run multiple queries in each execution - Execute multiple SQL statements at once, which will make the synchronization process faster. Use transaction - Rollback all data when error occurs. |
| Edit Script | Open the Edit Deployment Script window to rearrange the order of the scripts. |
| Copy Script to Clipboard | Copy all scripts from the Deployment Script tab to the clipboard. |
| Open Script in Query Editor | Open a new query window and display the scripts. |
In the Edit Deployment Script window, use the arrow buttons to move the scripts.

Then, click the Start button to execute the scripts. The window will display the execution progress, execution time, and success or failure messages.